


The Delicate Art of Coral Tuile: A French Pastry Masterpiece
Discovering the elegant technique behind one of France's most stunning edible garnishes
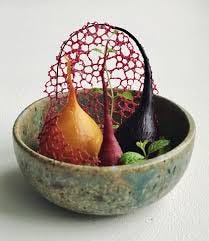
In the refined world of French patisserie, few techniques capture the eye quite like coral tuile. These delicate, lace-like wafers emerge from the oven resembling intricate coral formations, their golden lattice patterns creating an almost architectural beauty that transforms any dessert into a work of art. But behind this stunning visual lies centuries of culinary craftsmanship and a technique that demands both precision and artistry.
A Brief History: From Roof Tiles to Coral Reefs
The term "tuile" comes from the French word for roof tile, originally describing thin, curved cookies that resembled the clay tiles adorning French rooftops. Traditional tuiles emerged in French cuisine during the 19th century, initially as simple, curved wafers served alongside ice cream or used as elegant cookie garnishes.
The evolution to coral tuile represents a more modern innovation in French patisserie, likely developing in the late 20th century as chefs began experimenting with creating more dramatic visual effects using the basic tuile technique. The "coral" variation involves creating a batter that, when spread thin and baked, forms delicate, branching patterns reminiscent of ocean coral formations.
This technique gained popularity in high-end restaurants and patisseries where presentation became increasingly important. Renowned French chefs began using coral tuiles not just as garnish, but as structural elements in dessert architecture, creating towering compositions that showcased both technical skill and artistic vision.
The Science Behind the Beauty
Creating coral tuile successfully requires understanding the science behind the transformation. The batter, typically made with butter, sugar, flour, and egg whites, undergoes a fascinating metamorphosis in the oven. As the mixture heats, the butter melts and spreads, while the proteins in the egg whites coagulate and the sugars caramelize, creating the golden color and crispy texture.
The "coral" effect comes from the way the batter is applied and how it behaves during baking. When spread very thinly in irregular patterns or allowed to spread naturally on parchment, the mixture creates organic, branch-like formations as different areas bake at slightly different rates. The result is a delicate structure with varying thicknesses that create the characteristic lacy appearance.
Temperature control is crucial. Too hot, and the tuile burns before properly setting. Too cool, and it won't achieve the right texture or color. The ideal baking temperature allows for gradual browning while maintaining the delicate structure that gives coral tuile its distinctive appearance.
Mastering the Technique
The beauty of coral tuile lies not just in its appearance, but in the meditative process of creating it. Unlike many pastry techniques that demand speed, coral tuile rewards patience and attention to detail. The baker must work with the batter's natural tendencies, guiding rather than forcing the formation of patterns.
Professional pastry chefs often create templates or use specialized techniques to achieve consistent results, but part of coral tuile's charm lies in its organic unpredictability. No two pieces are exactly alike, making each one a unique work of edible art.
The timing of removal from the oven is critical. The tuile must be golden and set, but still pliable enough to shape if desired. Once cooled, it becomes completely rigid, so any shaping must happen in the brief window when it's still warm and flexible.

Classic Coral Tuile Recipe
Yields approximately 12-15 coral tuiles
Ingredients:
60g (4 tablespoons) unsalted butter, softened
60g (1/2 cup) powdered sugar
2 large egg whites, at room temperature
60g (1/2 cup) all-purpose flour
Pinch of salt
Optional: 1 teaspoon vanilla extract or other flavoring
Equipment:
Silicone baking mat or parchment paper
Offset spatula or spoon
Baking sheet
Fine-mesh sieve
Instructions:
Prepare your workspace: Preheat oven to 350°F (175°C). Line a baking sheet with a silicone mat or parchment paper. Have all ingredients at room temperature.
Create the batter: In a medium bowl, cream the softened butter with powdered sugar until light and fluffy, about 2-3 minutes. Gradually add egg whites, mixing until smooth. Sift the flour and salt together, then fold into the butter mixture until just combined. Add vanilla if using.
Rest the batter: Allow the batter to rest for 15-20 minutes. This helps the flour hydrate and makes spreading easier.
Shape the coral: Using an offset spatula or the back of a spoon, spread small amounts of batter very thinly on the prepared surface in irregular, organic shapes. Aim for translucent thinness in most areas, with some slightly thicker "branches" to create structure. Leave space between each tuile as they will spread during baking.
Bake to perfection: Bake for 6-10 minutes, watching carefully. The tuiles should turn golden brown with some areas slightly darker than others. The exact time depends on thickness and oven variations.
Cool and store: Allow tuiles to cool completely on the baking sheet. They will crisp as they cool. Once completely cool, store in an airtight container with parchment between layers. Use within 2-3 days for best texture.
Professional Tips:
Consistency matters: The batter should coat the back of a spoon but still flow easily. Adjust with a few drops of egg white if too thick, or a pinch of flour if too thin.
Practice your spreading technique: The key to beautiful coral patterns is learning how the batter behaves. Start with simple shapes and develop your technique gradually.
Watch the color: The difference between perfectly golden and burnt can be seconds. Stay near the oven during the final minutes of baking.
Embrace imperfection: The organic, irregular nature of coral tuile is part of its beauty. Don't strive for perfect uniformity.
Serving and Presentation
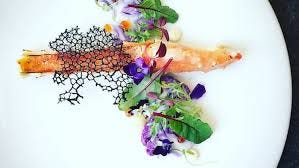
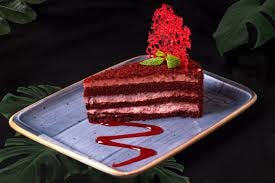
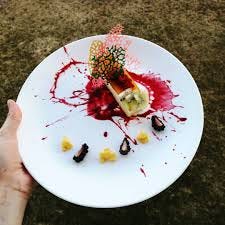
Coral tuile shines as both garnish and structural element. Use it to crown scoops of ice cream, as a delicate accompaniment to chocolate desserts, or as an elegant cookie alongside coffee or tea. In restaurant presentation, coral tuile can create height and drama, turning a simple dessert into a memorable experience.
The contrast between its delicate appearance and satisfying crunch makes it particularly effective with creamy desserts like panna cotta, mousse, or custard. The neutral, slightly sweet flavor complements rather than competes with other dessert components.
The Stovetop Method: Tuile Dentelle Sans Oeuf
While the oven method produces stunning results, there exists another approach to creating coral tuile that predates the modern technique: the stovetop method, known in French as "tuile dentelle sans oeuf" (lace tuile without egg). This traditional technique, favored by many old-school French pastry chefs, creates an entirely different but equally elegant effect.
The stovetop method produces tuiles with an even more delicate, glass-like quality. Without eggs to provide structure, the resulting wafers are incredibly thin and brittle, with a transparency that catches light beautifully. This technique requires different skills—instead of spreading batter, you're essentially creating an edible caramel glass that naturally forms coral-like patterns as it bubbles and sets.
The Elegance of Simplicity
What makes the stovetop coral tuile particularly elegant is its minimalism. With just three or four ingredients—typically butter, sugar, flour, and sometimes cream—it relies entirely on technique and timing to create its magic. The process is almost alchemical: watching simple ingredients transform into golden, branching formations through nothing more than heat and the cook's intuition.
This method celebrates the pure essence of the tuile concept. Without the binding properties of egg whites, the mixture becomes entirely about the interplay between sugar's caramelization and butter's richness, creating structures that are paradoxically both more fragile and more flavorful than their egg-based counterparts.

Classic Stovetop Coral Tuile Recipe (Sans Oeuf)
Yields approximately 8-10 delicate coral formations
Ingredients:
80g (6 tablespoons) unsalted butter
80g (1/3 cup) granulated sugar
40g (1/3 cup) all-purpose flour
2 tablespoons heavy cream
Pinch of salt
Optional: 1/2 teaspoon vanilla extract
Equipment:
Heavy-bottomed saucepan
Wooden spoon
Silicone baking mat or well-buttered parchment
Offset spatula
Fine-mesh sieve
Instructions:
Prepare your surface: Line a baking sheet with a silicone mat or heavily buttered parchment paper. Have this ready near your stovetop, as timing will be crucial.
Create the base: In a heavy-bottomed saucepan over medium-low heat, melt the butter completely. Add the sugar and stir constantly until the mixture begins to turn a very light amber color, about 3-4 minutes.
Add flour carefully: Remove from heat temporarily and whisk in the flour, working quickly to prevent lumps. The mixture will be thick and paste-like.
Finish the mixture: Return to low heat and gradually add the cream, stirring constantly. Cook for another 1-2 minutes until the mixture becomes smooth and glossy. Add salt and vanilla if using. The consistency should be like thick honey when hot.
Work quickly: While the mixture is still very warm but not scalding, drop small spoonfuls onto your prepared surface. Using the back of a spoon or offset spatula, quickly spread each portion into thin, irregular shapes. The mixture will continue to spread slightly on its own as it cools.
Allow natural formation: As the mixture cools and sets, it will form natural coral-like patterns where thinner areas cool faster than thicker ones. This creates the characteristic branching effect.
Cool completely: Allow tuiles to cool entirely before removing from the surface. They should be golden, translucent, and completely crisp.
Mastering the Stovetop Technique:
Temperature control is everything: Too high heat will burn the sugar before the flour cooks properly. Too low heat won't create the right texture.
Speed matters: This technique requires confidence and quick action. Have everything prepared before you start cooking.
Embrace the organic process: Unlike oven tuiles where you control the shape, stovetop coral tuiles form their patterns naturally as they cool. Part of their beauty lies in this unpredictability.
Practice timing: The window for spreading is brief but not frantic. The mixture should be workable for about 30 seconds after removing from heat.
When to Choose Stovetop Over Oven
The stovetop method excels in certain applications where its unique characteristics shine:
For delicate garnishes: The glass-like quality makes these tuiles perfect for topping light desserts where you want visual impact without overwhelming the palate.
Restaurant service: The quick cooking method makes it practical for à la minute preparation, allowing chefs to create fresh tuiles during service.
Flavor intensity: Without eggs to dilute the taste, stovetop tuiles have a more concentrated butterscotch flavor that pairs beautifully with vanilla, caramel, or coffee-based desserts.
Textural contrast: The extra-crisp texture provides more dramatic contrast against creamy elements than softer, egg-based versions.
Beyond the Basics: Variations and Innovations
Once you've mastered both techniques—oven and stovetop—coral tuile offers endless possibilities for creativity. Consider these variations:
Colored coral: Add a few drops of food coloring to create vibrant coral formations
Flavored versions: Incorporate citrus zest, cocoa powder, or spice blends into the batter
Shaped coral: While still warm, gently shape pieces over curved surfaces to create dimensional elements
Chocolate coral: Drizzle melted chocolate over cooled tuiles for added richness and visual interest
Hybrid techniques: Combine both methods in a single dessert for varied textures and visual interest
The Reward of Patience
In our fast-paced culinary world, coral tuile represents something increasingly rare: a technique that cannot be rushed. It demands presence, attention, and respect for the process. The reward is not just in the stunning final product, but in the meditative act of creation itself.
Each coral tuile tells a story of transformation—simple ingredients becoming something extraordinary through the application of heat, time, and human touch. In mastering this technique, we connect with generations of French pastry chefs who understood that true culinary artistry lies not in complexity, but in the perfect execution of fundamental techniques.
Whether you're a professional pastry chef looking to add drama to your dessert presentations or a home baker seeking to elevate your skills, coral tuile offers a pathway to creating something truly spectacular. The technique may be demanding, but the results—those delicate, golden formations that seem to float above your desserts like edible jewelry—make every moment of careful attention worthwhile.
Coming Soon, I will be making a video of the more trendy and easy way of masking coral tuile. Stay Tuned!!!

Share this post